If you aren't interested in the "background" of where VSELink came from, click here to go straight to the instructions!
One of the recent innovations that SDR radios have provided is the ability to display cluster/skimmer spots within the SDR Panadaptor. This facility is further advanced by logging programs which are able to customize the colour of displayed spots depending on various criteria. This is especially useful in contests where the spot can be used to indicate worked/multiplier status.
This allows the operator to see "at a glance" whether a station can/should be worked, greatly improving S&P (search & pounce) rates.
I first used this feature on the FlexRadio SmartSDR/Maestro and Flex soon added the ability to receive UDP spot broadcasts from the popular N1MM+ contest logging software.
I have recently become keen on /P operation (specifically on VHF/UHF) and wanted a dedicated setup for this so decided on the SunSDR2 Pro from Expert Electronics as this is able to work on bands up to 2m (144Mhz) without needing a transverter and was pleased to see that it also supports displaying spots on the panadaptor of their excellent ExpertSDR2 software.
Unfortunately, the support doesn't extend to getting spots directly out of N1MM+ so it doesn't display the worked/mult status. I understand that there are other loggers which do work directly with ExpertSDR2 and N1MM+ are apparently in the process of adding support but there is no ETA as yet.
Expert Electronics have developed a protocol that they have called TCI (Tranceiver Control Interface) which is a Websockets based two-way interface allowing control of many functions of the radio (including displaying/removing spots from the panadaptor).
So with this in mind, and being a "bit" of a programmer, I wondered how hard can it be to create a bit of "middleware" that receives the UDP spot broadcast from N1MM+ and forwards it (via TCI) to ExportSDR2? The answer was quite easy and VSELink is the result!
I decided to write it as a command line application in Microsoft Visual C++ as I wanted something lightweight with the minimum of external dependencies. Although I used VC2017, I decided to target VS2010 (v100) as almost every Windows XP or above computer should have the runtime libraries already installed
Since the initial "test" release, I have modified and improved the functionality of the software so the current features are:
- Automatic install/remove as a Windows service
- Configurable debug logging levels (0=none, 6=full)
- XML based configuration file
- Configurable spot colours for each type of spot
- Configurable UDP port for N1MM+ spot broadcasts
- TCI Host/Port can also be configured and stored in XML file.
- Caches all "current" spots and will re-send them on restart of ExpertSDR2
- Will automatic re-connect to ExpertSDR2 on failure
- Transverter support
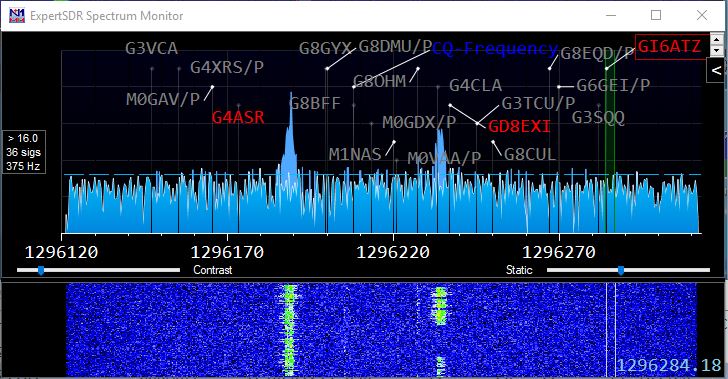
- **New for v0.4b** - N1MM+ Spectrum Monitor support.
I am open to suggestions for additions/improvements, one thing that I am currently considering is a GUI that will run as a seperate program and perform IPC (inter-process communication) with the VSELink service to gather information about current spots etc. This would have no impact on the running of VSELink which can happilly manage many thousands of spots with tiny CPU load and memory usage.
Installation/Operation of VSELink
There is no installation process, simply extract the .zip file to the directory of your choice and run the program VSElink.exe. As a console application, it has various options that can be set via command-line parameters. These are then stored in the file VSELink.xml so will be used automatically the next time the program is run.
The current command-line options are:
| Option | Default | Description |
| --help (or -h) | Will display the options available | |
| --spectrum= | false | Enable spectrum display true/false |
| -debug= | 0 | 0 being none and 6 being full debug output |
| --n1mmport= | 12062 | The port number configured in N1MM+ for Spot broadcasts |
| --tcihost= | 127.0.0.1 | The host that is running ExpertSDR2 |
| --tciport= | 40001 | The port that ExpertSDR2 uses for TCI |
| --install (or -i) | none | Install as a Windows Service (auto-start enabled) |
| --remove | none | Remove the Windows Service |
These should be fairly self-explanatory I hope?
By default (--debug=0) the system will display/log a message every 30 seconds showing the number of spots received and the number of "current" spots. As there is always the possibility that a spot will not be deleted by N1MM+ for whatever reason (program crash etc.) so spots have a maximum life (called SpotLifeTime in VSELink.xml with a default of 7200 seconds) which when exceeded will send a delete command to ExpertSDR2 and remove the spot.
Most users shouldn't "need" to manually change the VSELink.xml file as settings can be managed by command line options and I wouldn't recommend editing it unless you want to change specific options that aren't available via the command line (spot colours and transverter settings being the main ones)
The default VSELink.xml is shown below:
<VSELink>
    <N1MMSpotPort>12062</N1MMSpotPort>
    <Debug>6</Debug>
    <TCIHost>127.0.0.1</TCIHost>
    <TCIPort>40001</TCIPort>
    <SpotBusyColour>0xff4d4d4d</SpotBusyColour>
    <SpotBustColour>0xff4d4d4d</SpotBustColour>
    <SpotCQColour>0xff51a8ff</SpotCQColour>
    <SpotDupeColour>0xff4d4d4d</SpotDupeColour>
    <SpotSingleMultColour>0xffff0000</SpotSingleMultColour>
    <SpotDoubleMultColour>0xff0d9d0d</SpotDoubleMultColour>
    <SpotNewQSOColour>0xff51a8ff</SpotNewQSOColour>
    <SpotLifeTime>7200</SpotLifeTime>
    <SpectrumDisplayEnabled>false</SpectrumDisplayEnabled>
    <SpectrumDisplayHost>127.0.0.1</SpectrumDisplayHost>
    <SpectrumDisplayPort>13064</SpectrumDisplayPort>
    <SpectrumSampleSize>512</SpectrumSampleSize>
    <SpectrumSampleRate>48000</SpectrumSampleRate>
    <SpectrumFrequency>3</SpectrumFrequency>
    <SpectrumScalingFactor>0.3</SpectrumScalingFactor>
    <SpectrumCorrection>40</SpectrumCorrection>
    <Transverters>
        <Transverter rf="1296000" if="144000"/>
        <Transverter rf="432000" if="28000"/>
    </Transverters>
</VSELink>
The first settings are pretty obvious, the N1MM UDP port, Debug level and TCIHost/Port are all configurable via command line. The rest of the options should be OK for most users but if you want to change the colours used when displaying spots, the maximum lifetime (in seconds) or transverter options, then you will need to delve into this file. Any text editor should be fine (including Windows Notepad).
Each SpotXXColour setting corresponds to a type of spot that N1MM+ can send and should match the default colours used in N1MM+. They are 64bit ARGB hex values with the first two hexadecimal digits being the A (or alpha) value, the second two are R (red), the third are G (green) and the fourth B (blue). Each value can be between 00 and FF (0-255 in decimal). There are many online hex colour builders available so you can find that perfect shade. Remember to set the A (alpha) high enough so you can actually see it though as a value of 00 means it is fully transparent (FF is fully opaque). Make sure that you don't remove the "0x" from the beginning as that is what tells the system that it is a hexadecimal number.
You can also change the SpotLifeTime setting. This is the maximum amount of time that a spot can exist (in seconds). After this time, it will be deleted from the panadaptor (and from the internal cache of VSELink). You can adjust this time if you find that some old spots are not disappearing but N1MM+ usually manages this quite well.
The newest feature of VSELink is sending spectrum data to N1MM+. This is a fairly complex process as the TCI protocol sends raw I/Q samples which must be put through an FFT algorythm (Fast Fourier Transform) and then various other calculations must be performed before the "magnitude" data is sent to N1MM+ for display. The process is full of pitfalls and other problems but I hope that I have "just about" got it right?
There are various options in the VSELink.xml file for managing this process but you should be able to get a working display simply by running "VSELink --spectrum=true". By default only 48Khz of spectrum are sent to N1MM+, this can be set to 96/192Khz if required by manually editing the xml file. SampleSize is the number of individual samples sent to N1MM+. You can increase or reduce it althoughI'm not sure what the maximum is? Higher numbers result in a higher resolution Spectrum Monitor but if you set this too high, nothing will be displayed.
ScalingFactor is the setting that I have played around with the most, 0.3 seems to give the most consistent results but you can try any number in here. VSELink attempts to automatically scale the spectrum output by determining an "average" level but this is something that I still have to work on
The final feature that can be configured via VSELink.xml is the Transverters setting. This is a "workaround" to the fact that as of v1.20 of ExpertSDR2, there is no native support for transverters. N1MM+ allows you to enter an offset within the Bandmap window (Set Transceiver Offset Frequency) which means that if you click on a spot within the Bandmap, it sends the correct frequency to the radio. As spots are sent with the "full" frequency, this means that ExpertSDR2 will try to set a frequency outside of its coverage range which will fail.
The Transceivers section is basically a duplicate of what you can set within the N1MM+ "Change Transceiver Offset Frequencies" forcorrect operation, these two should match. By default, I have added support for 23cm->2m and 70cm->10m transverters. It is currently necessary to list any transverters in descending RF frequency order within this list for the feature to work correctly. All frequencies are in Khz.
You will need to add these to N1MM+ as by default the offset list is empty. This is quite straight-forward though, simply right-click within the Bandmap window and select "Change Transceiver Offset Frequencies", then enter the RF and IF frequencies into the box. After you make this change, clicking on any spot (whether within the Bandmap or the ExpertSDR2 panadaptor) will result in the correct frequency being used.
If your transverter is slightly off-frequency, you could add/remove that difference from the if= entry or rf= within the Transceivers section (if was incorrectly called lo in the original 0.1b version of VSELink.)

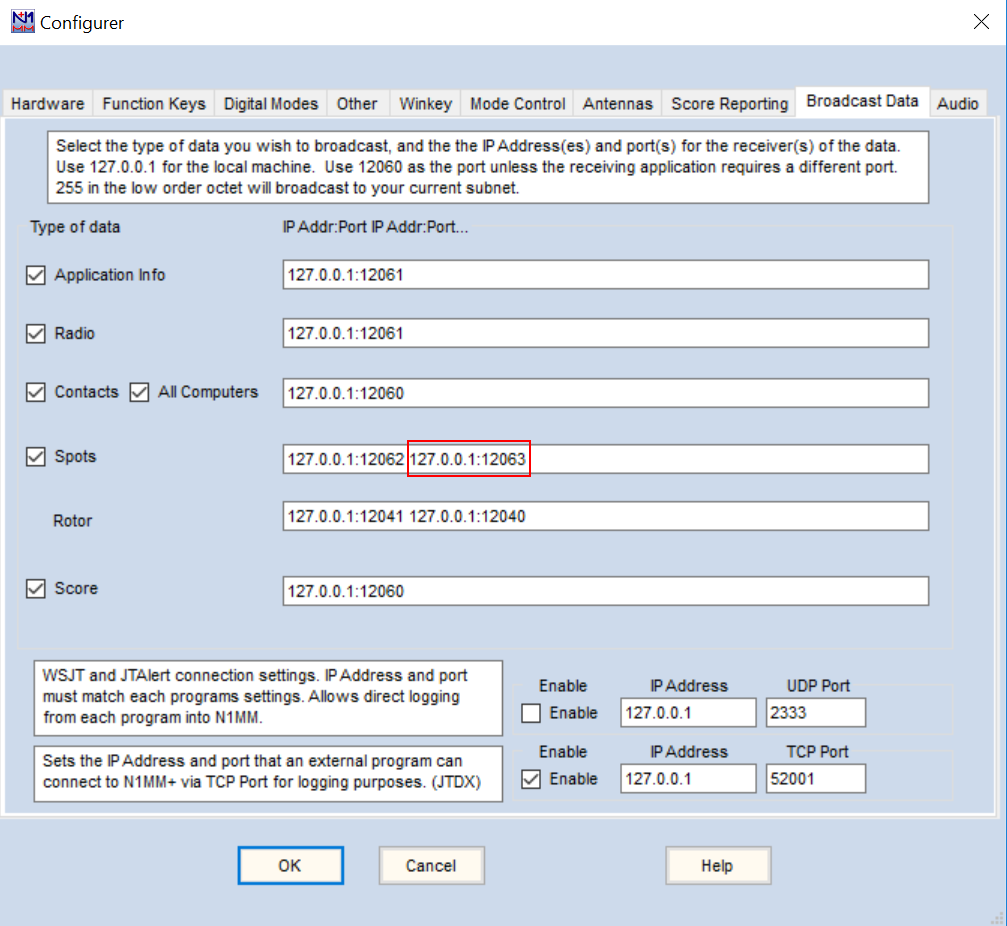
Once installed, you will need to configure N1MM+ to send spots to the correct port. This is done through the Config/Configure Ports, Mode Control, Audio, Other... menu item under the Broadcast Data tab. If VSELink is running on the same computer and you are OK using the efault port, enter "127.0.0.1:12062" in the box next to Spots (and check Spots).
 You will also need to enable TCI (if not already enabled) within ExpertSDR2. Options/TCI tab select Enable and within the Options/Display section. In the Spectrum tab make sure "Show spots" is enabled!
You can download the latest version of VSELink below. Please note, that this is BETA software and has not been extensively tested on every possible configuration but it should work!
If you are already running a previous version of VSELink, to upgrade, simply overwrite the existing VSELink.exe file with the new one. Any new settings in VSELink.xml will automatically be populated the first time it is run. ** Make sure that the VSELink program/service isn't running before trying to overwrite it! **

Version 0.50b hopefully fixes a frequency accuracy issue for countries where the comma is used as a decimal seperator.
